Sunday, November 18, 2012

Fresh Cranberry Orange Scones


If food was rated on the man scale, these scones would get a crumb-dusted smile with a sticky fingered thumbs up. Not only did "A" scarf down two of these for breakfast, he ever so politely asked me if he could eat just one more after our bike ride yesterday. Then this morning? He sneaked in another one before I even had a chance to scrub the sleep off my eyes.


I think there might have even been a request for this to be a weekly thing. Or for me to drop everything and open a bakery just for him ASAP. The details are a little melted as never has a simple breakfast been so well received by "A." My mind was too in awe.


As it tis the season of all things red, fat filled and sugar laden, cranberry baked something was just calling my name this weekend. Sure, there are some dried cranberries in the pantry. Great, there might be some canned pumpkin shoved in the back. But the farm fresh goodness is where it's at.


"A" has been collecting cranberries from all the farmers across the land so saying there was a surplus is not a stretch. Check - cranberries all accounted for. Yet something was missing, I wanted more. MORE I tell you! 


Good thing I found a random (but really, where did it come from?) orange in my purse. Totally normal right? I hope it wasn't tainted and stuck into my satchel as a cruel joke. Even if this is so, joke is on you sir as I won and these scones are delicious.

You don't want to know about poisoned oranges and hoarded cranberries though. You want to make these, right? It's super easy if you have a food processor and, I would assume, a cinch if you just had a pasty cutter. Either way, the goal is to cut up the chilled butter so it's well distributed in the flour mixture but some small pieces of butter should exist.

After that it's the standard one two punch of combining the wet ingredients with the dry.

Before you know it, you'll be sconed.

Fresh Cranberry Orange Scones
Adapted from Slash of Something
Ingredients:
  • 2 ½ cups all-purpose flour
  • ¼ cup granulated sugar, plus more for sprinkling on tops of scones
  • 1 tablespoon baking powder
  • ¾ teaspoon kosher salt
  • 1 tablespoon grated orange zest
  • 6 tablespoons chilled goat butter, cut into small cubes
  • 8 oz. fresh cranberries, roughly chopped
  • 2 teaspoons freshly squeezed orange juice
  • 1 scant cup whole goat milk, plus more for brushing on tops of scones
  • 1 large egg
  • 1 teaspoon pure vanilla extract

Directions:
  1. In the large bowl of a food processor, place the dry ingredients and orange zest, and pulse to combine. Add the goat butter butter, and pulse 10 or so times to combine. There should still be small pieces of butter. Transfer flour mixture to a large mixing bowl. Fold cranberries into mixture.
  2. In a large measuring cup, place goat milk, egg, orange juice and vanilla. Mix well, then pour into flour mixture. Using a fork, fold (do not stir) the wet mixture into the dry mixture while gradually turning the bowl. When dough begins to come together, gently kneed dough into a ball shape.
  3. Transfer dough ball to floured board, and gently pat it into a 6- or 7-inch circle. Use a pastry scraper or large chef’s knife to cut it into 8 triangles.
  4. Place the scones on a parchment paper or silpat lined baking sheet and freeze for 30 minutes.
  5. Preheat oven to 425 degrees. Brush tops with cream, and sprinkle with sugar. Bake for 20 to 25 minutes, turning pan halfway through. Scones are done when a toothpick inserted in the center comes out clean.


Wednesday, October 24, 2012

Chocolate Chip Walnut Cocoa Nib Cherry Cookies


I finally got up the guts to blog a bit more. It's been a while, I know. I could make excuses until you felt like slapping me in the face but I won't. I'll save my face and your soul. Guys, I'm just kinda tired and my bedtime is ever so slowly creeping up to 7:00pm. Not that extreme, but definitely something like 10:00pm. A girl can dream.

But these cookies need little introduction. The cherry season was too short this season and my craving was never fully fulfilled. My pit spiting was never perfect and not enough cherry pies were made. I just had to work with what nature gave me and used some dried cherries. And the combination of cherry and chocolate.

I brought these suckers to "A's" work BBQ and I'm proud to say they were the first baked good to run out. As I've been in a bit of a baking lull lately, I've been riding that back-patting train for a while now. So I present with little comment some of the greatest "everything-but-the-kitchen-sink" cookies this little Madison kitchen has ever produced.


Oatmeal Walnut Cherry Cocoa Nib Cookies
Adapted from Joy the Baker
Ingredients:
  • 1 cup (2 sticks) goat butter, softened
  • 1 cup granulated sugar
  • 1 cup brown sugar, packed
  • 2 large eggs
  • 2 teaspoons pure vanilla extract
  • 2 cups all-purpose flour
  • 1 teaspoon baking powder
  • 1 teaspoon baking soda
  • 3/4 teaspoon salt
  • 2 1/2 cups old fashioned oats
  • ½ cup coarsely chopped walnuts
  • 1 cup dried cherries
  • 1/2 cup cocoa nibs
  • 1 cup dark chocolate chips

Directions:
  1. Place racks in the center and upper third of the oven and preheat oven to 350 degrees F.  Line two baking sheets with parchment paper and set aside.
  2. In the bowl of an electric stand mixer, fitted with a paddle attachment, add butter and sugars.  Beat on medium speed until the mixture is light and fluffy, about 3 to 5 minutes. Scrape down the bowl and beat in eggs.  Add eggs one at a time, beating for one minute on medium speed between each addition.  Beat in the vanilla extract.
  3. In a medium bowl, whisk together flour, baking powder, baking soda, and salt.  Add flour mixture all at once to the butter and egg mixture.  Beat on low speed until the mixture just comes together, don't fret if there are still some pockets of flour (they'll be taken care of later.)
  4. Remove the bowl from the stand mixer. With a spatula, mix in the oats, walnuts, cherries, cocoa nibs, and chocolate chips. Make sure no flour pockets remain.
  5. Scoop dough out by the tablespoonful onto prepared baking sheets. Bake for 10 to 13 minutes until toasted brown on top.  Remove from the oven.  Allow to cool for 5 minutes before removing to a wire rack to cool completely.


Monday, September 17, 2012

Lavender Wedding Cake with Dark Chocolate Ganache and Honey Buttercream


It's kind of a slight problem when you're at a wedding three states over, and people you barely know (talking to you Mr. Cory D) give you a hard time about the last time you updated your blog. Calm down, people. Calm down left side of the table at the rehearsal dinner. I appease you. You beat me down, made me drink an extra beer to relax and gave me to gusto to write a blog post. Ironically, it's for a wedding cake.

About a month ago, some of A's friend asked him if, oh you know, they could ever so casually get married at his cabin up in Northern Wisconsin. Standard. Normal bar talk. Being who I am, I immediately slammed my palms onto the worn wood of the Weary Traveler and offered to make a cake. Later, I was somehow also roped into being their all official-like photographer.


At this point, I'm not sure if we were even in our apartment yet or if we were still homeless and sleeping on a friends' couch. They were blurry times, friends. Don't expect me to remember such silly details of where I slept at night. Who cares where I lay my head, most concerns lie in the status of my kitchen. And all I know is that at when I offered to make my first ever wedding cake, I had never turned on my new oven.


Fact: don't do what I did. You will soon find out that your oven is about, oh, exactly 100 degrees hotter than it should be. Your delicate lavender cake will be running behind schedule, and it's so hot outside that it is cosmically impossible to keep buttercream from melting. For fun, also add on a 7+ hour car ride. Break even and call it an adventure?

Sure.

The cake may have been a bit drier than I would have intended, but my (buttercream) meltdown lead to a damned tasty ganache and a creamy honey buttercream filling. So when you make your next wedding cake, a few pointers: get an over thermometer, budget for extra time and make sure vegan White Russian ingredients are within arms reach.


Lavender Cupcakes
Adapted from Yummy Mummy
Ingredients:
  • 1 cup granulated sugar
  • 1/2 teaspoon dried lavender flowers
  • 1 cup goat butter, at room temperature
  • 4 eggs
  • 2 cup all-purpose flour
  • 3 teaspoon baking powder
  • 1/2 teaspoon salt
  • 4 tablespoons goat milk

Directions:
  1. Preheat the oven to 350°F; grease baking pans with goat butter and dust with flour.
  2. Put the sugar and lavender flowers in a food processor. Process briefly to combine.
  3. Tip the lavender sugar into a bowl with the butter and beat together until pale and fluffy.
  4. Beat the eggs into the butter mixture, one at a time, then sift in the flour and fold gently. Stir in the milk, then spoon the mixture into baking pans.
  5. Bake for about 30 minutes until risen and golden and a skewer inserted in the center comes out clean, then transfer to a wire rack to cool. 


Honey Buttercream
Ingredients:

  • 1 cup goat butter, softened at room temperature
  • 1/3 cup honey
  • 4-5 cups powdered sugar
  • Dash of goat milk
Directions:

  1. Beat butter in a stand, or hand, mixer until fluffy. Add honey and beat for 2 minutes.
  2. Slowly beat in powdered sugar a few tablespoons at a time until desired consistency is reached. Add goat milk to thin out buttercream if needed.


Chocolate Ganache
Ingredients:

  • 9 oz whole goat milk
  • 9 oz dark chocolate, finely chopped
  • A few squeezes of clover honey
Directions:

  1. Heat the cream in a small saucepan.  Pour over chopped chocolate, let sit for one minute, add honey, then whisk until smooth.  Place in refrigerator to cool, stirring every 10 minutes to ensure even cooling.  When desired consistency, frost cake.

Tuesday, August 28, 2012

Chicken Tagine with Apricots, Almonds & Chickpeas


Toto, I don't think we're on the West Coast anymore! Move a bit to the east, a bit more… yep, right there in Wisconsin! That's right folks, "A" and I landed in America's Dairyland a little over 2 weeks ago and have been attempting to set up our apartment ever since.

I could go on and on about the trials and tribulations of moving, but I'll save your eyes. I assume most of you have moved at least once and know how it goes. Live on the third floor of an older house, discover you have a slight bat problem for the first week and live out of boxes for an unreasonable amount of time. You know, that ol' schtick. Since we moved our boxes in last week, we have managed to set up a bed, I finally put away my clothes and the kitchen. Oh the kitchen. It was the first thing we focused on and currently the only room worth cleaning. While we're still working out some storage issues, I am proud to announce that after being kitchenless for almost a month, I am back in business.


I don't know if I've ever told you why I moved to Madison in the first place. I decided to be a bit cliche and move with my boyfriend for his job. Yes, there were a lot of tears at first. Yes, I miss Seattle every day and probably will for a while. But you know what? Madison is a pretty great town. The area we live in reminds me of SE Portland and people here really care about their food. I recently was offered, and accepted, an exciting job that I think will bring me down a perfect career path. To top all this off, I get to see the guy I love every day.

To celebrate "A's" second week of work, I got down in the kitchen for the first time. Getting into a cooking project before you know how accurate your oven temp is or how the burners work is an experience. Definitely wouldn't recommend something fancy and French. Yet as we are all classy people here, it still needs to have a touch of elegance. Enter the tagine. Starts on the stovetop, ends in the oven, low n' slow throughout.


As we don't have a ton of counter space, I couldn't recommend prep bowls more. While no recipe demands them, I always think it makes whatever I make turn out better. Instead on frantically fussing around with prepping the next add-in, I can focus on how my food is cooking. You may already know this, but until last year (GASP!) when my mom bought me some prep bowls, I woefully was in the dark.

Now that the world turned up the heat in the Midwest (again), I would recommend making this in the fall as the stovetop and oven need to be on for quite some time. But when you decide to make it, know you'll be walking into a Moroccan, apricoty, fall-of-the-bone-chicken goodness!


Chicken Tagine with Apricots, Almonds & Chickpeas
Serves 6 to 8
Adapted from The Kitchn

Ingredients:
  • Olive oil
  • 3 pounds chicken legs and thighs (about 4 each)
  • 1 yellow onion, diced
  • 1 carrot, peeled and diced
  • 2 cloves garlic, minced
  • 1-inch piece ginger root, peeled and minced
  • 1 teaspoon coriander
  • 1 teaspoon cumin
  • 1 teaspoon cinnamon
  • 1 cup chicken stock
  • 1 cup dried couscous
  • 1/2 cup dried apricots, roughly chopped
  • 1 tablespoon honey
  • 1/4 cup almonds, roughly chopped
  • 2 cups (1 15-oz can) chickpeas, drained and rinsed
  • 2 tablespoons cilantro, optional, for serving

Directions:
  1. Preheat the oven to 300°.
  2. Warm one tablespoon of oil in a large Dutch oven (at least 5 1/2-quarts) or tagine over medium-high heat until the oil flows easily and you can see it shimmering. Sprinkle the chicken pieces with salt and pepper, and place as many as will fit into the pan without crowding (I had to do two batches of chicken).
  3. Sear for 5 to 8 minutes, flipping once, until both sides are golden brown. Remove to a clean plate and continue searing the rest of the chicken pieces. If necessary, add more oil to keep a thin film on the bottom of the pan. If the oil starts smoking, turn down the heat.
  4. Pour off all but a teaspoon of oil and return the pan to medium heat. Sauté the onions and carrots with a half teaspoon of salt until softened and beginning to brown, about 10 minutes. Stir in the garlic and cook until fragrant, about 30 seconds. Sprinkle the ginger and spices over top and cook until fragrant, another minute.
  5. Stir the chicken stock and apricots into the pan, scraping up any seared bits that might be stuck to the bottom of the pan. Nestle the chicken pieces into the pan; try to fit them in a single layer, but it's ok if some pieces overlap.
  6. Bring the liquid to a boil, then reduce the heat to low. Cover the pan and transfer the covered cooking pot to a 300° oven. The tagine is ready when the chicken registers 165° on an instant-read thermometer in the thickest part of the meat and when its juices run clear. This should take approximately 90 minutes.
  7. While the chicken is cooking, prepare the couscous and set aside.
  8. Transfer the cooked chicken to a clean plate and tent with foil. Add the honey, almonds, and chickpeas to the pan with the apricots and onions, and cook at medium-high on the stovetop. Bring the stew to a rapid simmer and cook until it has thickened slightly. Taste the sauce and add salt if necessary.
  9. To serve, spread the cooked couscous on a serving platter and arrange the chicken pieces on top. Ladle the stew over top, making sure the chicken pieces each get a good coating. Sprinkle with cilantro and serve.
  10. Leftover chicken tagine will keep refrigerated for up to a week.


Thursday, July 19, 2012

Spicy Gravlax with Aquavit


Did I tell you my big news? It's a bit colder, but also kinda steamy, with beer and brats mixed in. You guessed it yet?


If you found yourself thinking "Madison, Wisconsin," you would be correct! If you thought "crazy cool camping trip in the North Cascades," you would be, sadly, quite awrong. As many of you may know, I hail from Michigan and my a-little-bit-less-than-quarter-life crisis involved me moving out to Seattle on a relative whim. I only visited the city once before moving here but the mountains, water and 50 to 75 degree no-humidity days did me in. I was hooked. I love Seattle more than any city I have ever lived in, made some life-long friends and know how successfully navigate from Capitol Hill to Queen Anne during rush hour without hitting a lick of traffic.


I'll miss Seattle and see myself coming back here a few times a year, but I love adventures and Madison is a new one. What's crazier is that I have never been to Madison. I am actually moving to a city I have never seen. With a guy. If you thought I went bonkers before you don't know what's coming. "A" accepted a job as a hydrogeologist with the USGS, my internship at Edelman ended and the timing stars aligned. 


So friends, readers, anyone in the Universe… as I have never been to Madison, I also don't know anyone there. If you want to meet up for coffee (Seattle got me hooked), just know this, I make a mean cookie. Who wants to hang out? I'll be the one with the curly red hair and box of friendship cookies. And maybe some of that salmon below.


But you don't want to hear about me pleading for a friend date and my 2,000 mile move back to the Midwest. You came here for the food, dangit! I think I have mentioned before that "A" is half Swedish (half German), translating to we eat lots of berries, pancakes and fish. But we wanted to dive into Swedish food a bit further and make our own gravlax, i.e. Swedish cured salmon. 

Pretty much since the dawn of dating him, he has told me about the little-used bottle of Aquavit in his freezer and an urge to cure his own salmon. That's basically how he wooed me. The gravlax itself is quite easy to put together with the most time consuming segment being mixing the spices together… and I guess that whole "curing" part too. To make things bit easier, when I went to the market to buy salmon, I told the fish monger exactly what I was planning on doing and he gave me two one-pound sections that fit together. If you don't have access to a monger, I recommend buying two equally sized tail cuts (no bones!) that fit nicely together.

I'll just leave with with the recipe as I now have peanut butter all over my keyboard (lunch fail) and have a bit of scrubbing to do.


Spicy Gravlax with Aquavit
Adapted from Kitchen of Light by Andreas Viestad

Ingredients:
  • 2 one-pound salmon fillets, skin-on
  • 1 tablespoon caraway seeds
  • 2 teaspoons aniseed
  • 5 juniper berries (India Tree makes some dried juniper berries that should be available at most markets)
  • 1/2 teaspoon crushed red pepper flakes
  • 1/2 teaspoon black peppercorns
  • 3 tablespoons salt
  • 1 1/2 tablespoons sugar
  • 3 tablespoons finely chopped fresh dill
  • 2 tablespoons Aquavit
Directions:
  1. Rinse the fillets in cold water and pat them dry with paper towels. Crush the caraway seeds, aniseed, juniper berries, red pepper flakes and black peppercorns using a mortar and pestle. Or place the spices on a cutting board or other hard surface and crush them with the underside of a heavy skillet. Combine with the salt, sugar, and dill.
  2. Place one of the fillets skin side down in a deep dish just big enough to hold the fillets. Rub the fillet with half the spice and dill mixture. Rub the other fillet with the mixture and place it skin side up on top of the first. 
  3. Pour the aquavit on top, cover the dish with plastic wrap, and place a heavy weight, such as two heavy plates or a saucepan, on top of the fish. Refrigerate for three to four days, turning the fish every 12 hours and basting it with the brine that accumulates in the dish.
  4. To serve, dust off some of the spices and slice the fish into thin slices with a sharp thin knife. The flesh from the tail will be leaner than the flesh from the belly. Serve with mustard sauce and dark rye bread, for open-faced sandwiches - see pictures for picnicking proof!


Wednesday, June 20, 2012

Oven-Puffed Pancake with Berries


I love brunch.

If that's all I wrote and walked away from my computer I think you'd get an idea how this goes down. I'd talk about breakfast potatoes/hash browns, coffee in kitschy cups and tucked away cafes. Maybe I'd mention a light Pacific Northwest sprinkle and lament on the art of a coffee bean. However, I think I'll ramble about berries and the beauty of a cast iron pan.


Very rarely do A and I make the same thing for brunch. Sure, we've had more pancakes before mountain adventures than I can even count, but the ingredients we're never the same. Fine, there has been an egg or two but rarely are they prepared in the same way nor are the veggie mix-ins repeated. So it goes without saying that this oven puffed pancake is a winner based on the fact that it's on a second run. Same ingredients, same preparation, maybe a bit warmer weather. Well, it is Juneuary so that last part may not be true.


As it comes together quickly and can incorporate whatever produce is in season, I highly recommend making this when entertaining guests or impressing your parents when visiting home. If they don't already own a cast iron pan (side note: Mom & Dad - suggestion for the one I got you for Christmas), buy them one now. They raised you, it's the least you can do. Peer pressure!

Saturday morning is only 3 days away so ready the kitchen for the greatest brunch you've ever tasted!

Oven-Puffed Pancake with Berries
Adapted from Two Tarts

Ingredients:
  • 3 tbs goat butter
  • 3/4 cup all-purpose flour
  • 1/2 tsp salt
  • 3 eggs
  • 1 cup almond milk
  • 1 tsp vanilla extract
  • 1 cup blueberries, raspberries, or blackberries (or combination), fresh or frozen

Directions:
  1. Preheat the oven to 450 F. Place the goat butter in a 10-in cast iron skillet, and place it in the oven.
  2. Combine the flour and salt in a large mixing bowl. In another bowl, whisk together eggs, almond milk milk, and vanilla. Add this to the dry ingredients, and whisk until combined and smooth.
  3. Wearing an oven mitt, remove the hot skillet from the oven (the butter should be bubbling), and pour in the batter all at once. Sprinkle the berries evenly over the top, and return the skillet to the oven. Bake until the pancake is nicely browned and puffed around the edges, 12 to 15 minutes.
  4. Remove the pancake from the oven (don't forget that oven mitt!). Cut into wedges and serve with a bit of maple syrup or powdered sugar.

Monday, June 11, 2012

Roasted Cauliflower with Israeli Couscous


Oh please, you shouldn’t have. A round of applause for posting within two weeks of my last post? Oh stop! Call it a mid-year resolution or that I’ve seen the blogging light radiating out from my computer screen. Either way, my camera is firmly planted on A’s couch ready to document our cooking adventures. Maybe not the popcorn for dinner ones.

I have a slight announcement to make but, until plans are set in stone, I am going to keep things vague. There may or may not be a move in the future, most likely by the end of the summer. My internship with Edelman is coming to a close next week and I’m looking forward to enjoying my free time in the (theoretical) Seattle sunshine. Plans are being made for mountainous hikes, city bikes and a little fun in Canada.

Now that I will have a bit more time on my hands (or in the kitchen), look forward to seeing posts more than once every ice age (the glacial event, not the never ending sequels of children's movies). For the time being though, I present you with my flavor of previous week - roasted cauliflower with Israeli couscous!

You would never believe it, but this was the first time I ever made Israeli couscous. Usually I order it without hesitation at restaurants and find myself craving it every few months but for some reason I never thought to make it myself. If you're spying on me, you can see that I'm kicking myself right now. Not only is Israeli couscous a lot easier to make than rice or normal couscous, I think it has a certain bite that the former are lacking.

That combined with my gut wrenching love of roasted vegetables, I had a lunch made in heaven on my hands. I even pawned some off on "A" for lunch twice last week... he didn't complain. Nor should he.


Roasted Cauliflower with Israeli Couscous
Adapted from The Whinery 

Ingredients:
  • 1 head of cauliflower (or other)
  • 1 head of purple cauliflower (or other)
  • 1 red bell pepper
  • 1 red onion
  • 2 tablespoons parsley, chopped (divided)
  • Olive oil
  • Salt
  • Crushed red pepper flakes
  • 2 tablespoons everyday seasoning (I use Trader Joe’s Everyday Seasoning)
  • 1 cup cooked black-eye peas (optional)
  • 2 tablespoons capers, rinsed (optional)
  • 1 – 2 cups Israeli couscous, cooked (recipe below)
Directions:
  1. Preheat oven to 400 degrees F
  2. Prep and cut cauliflower into florets
  3. Cut onion and bell pepper into even bite-size chunks and dump into a large bowl
  4. Add a tablespoon of parley
  5. Drizzle with olive oil, and add salt, crushed pepper and seasoning
  6. Toss and mix well to coat
  7. Spread out in a single layer onto a baking dish or pan
  8. Roast in the oven for about 15 – 25 minutes, until vegetables are tender and caramelized
  9. Mix in black-eye peas and capers with the vegetables and roast for another minute or so
  10. Remove from oven, mix in Israeli couscous, sprinkle another tablespoon of parsley on top and serve immediately


Israeli Couscous
Ingredients:
  • 2 cup Israeli couscous, preferably whole-wheat
  • 4 tablespoons extra virgin olive oil
  • 4 cups of water 
  • Salt to taste
Directions:
  1. Heat one tablespoon of the olive oil over medium-high heat in a medium saucepan and add the couscous.
  2. Stir until the couscous begins to color and smell toasty, 4 to 5 minutes. 
  3. Add water and salt to taste and bring to a boil. 
  4. Reduce the heat, cover and simmer 15 minutes, or until the couscous is tender. Drain if any liquid remains in the pan.
  5. When the couscous is done, fluff and set aside to be tossed with roasted cauliflower

Friday, May 25, 2012

Apple-Blackberry Cake


To quote Titanic: "Hello! Is anyone alive out there?" Well yes, yes I am and my, oh my, is it mighty fine to see you again.

I read once that the worst thing a food blogger can do is "apologize" for not posting frequently enough and that it’s annoying to readers. Internet, I’m going to go against you for one second here and say I’m sorry. I haven’t been completely away from my kitchen, but I’ve definitely been neglecting it. “A” and I still cook a few times a week, but his apartment is a little dark and I always forget my camera anyways. Then the food my girlfriends and I make at Tuesday Girls Night usually is consumed with such fervor that I wouldn’t have a shot at a photo anyways.

Heck, I ate kale chips and Bing cherries for dinner the other night. While it was delicious and fulfilled my cravings, it’s not really a meal I should brag about.

Excuses… excuses… but hey, I’m back! At work, we’ve been having a series of “Iron Chef” bake-offs. The first round was marshmallow. That Sunday I had a 10-hour adventure from Texas back to Seattle and was in no mood to get down in the kitchen. Pass on that round.

Second round? Cinnamon. I ended up making some cinnamon ginger snap cookies and toasted pecan and cinnamon ice cream sandwiches. While I failed to take a photograph, I was victorious and won a spot in the finals.

This past Monday was round 3 and the challenge was berries. I had been flirting with a few recipes but I ultimately decided on apple-blackberry cake. I didn’t want anything that was loaded with sugar or overly complicated. The dough is easy to put together; a simple whisking of the dry ingredients into the wet, fruit is pressed in and it’s good to go in the oven. Simple, delicious and impressive – my kind of recipe.

A few things to note though, I found myself having to put the cake in for a little longer than the recommended baking time but I wasn’t paying attention and ended up over baking it by a minute or two. If anything, next time I make this I would under-bake it slightly as let it firm up more in the pan.

Either way, this is a great dish to bring to a potluck either as a ‘healthy’ dessert or a side dish at a brunch.


Apple-Blackberry Cake
Adapted from Martha Stewart Living


Ingredients:
Granulated sugar, for coating pan
  • 1 1/2 cups all-purpose flour
  • 2 teaspoons baking powder
  • 1/2 teaspoon salt
  • 6 tablespoons goat butter, melted
  • 3/4 cup packed light-brown sugar
  • 1/2 cup goat milk
  • 2 large eggs
  • 4 McIntosh apples (about 1 1/2 pounds), peeled, cored, and cut into 8 wedges
  • 1 cup (1/2 pint) blackberries

 Simple Topping:
  • 2 tablespoons packed light-brown sugar
  • 1/4 teaspoon ground cinnamon
  • 2 tablespoons goat butter, cut into pieces


Directions:
  1. Pre-heat oven to 350 degrees.
  2. Butter a 9-inch springform pan, and dust with granulated sugar.  I used a 9.5″ springform pan and it worked well, but I wouldn’t recommend using one any larger, as the cake will be thin.
  3. Whisk together flour, baking powder, and salt in a bowl.  Whisk together melted butter, 3/4 cup brown sugar, milk, and eggs in another bowl.  Whisk into flour mixture.  Spread batter evenly into prepared pan.
  4. Arrange apple wedges over batter, and sprinkle with blackberries.  Gently press fruit into batter.  Combine remaining 2 tablespoons brown sugar and the cinnamon, and sprinkle over fruit.  Dot with remaining 2 tablespoons butter.  Bake until top is dark gold, apples are tender, and a cake tester inserted into center comes out clean, about 55 minutes.  Let cool.  Serve with whipped cream if desired.


Sunday, April 15, 2012

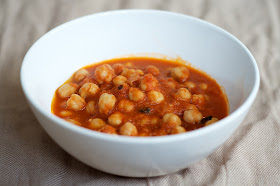
Chickpeas Stew with Roasted Cumin and Tomatoes


So far, it's been a pretty spectacular April. It actually reached 70 degrees here in Seattle last weekend; last year the first time that happened was May 20th. I started lead climbing again, after taking a year-plus long hiatus. I'm loving my job and for the first time in as long as I can remember, I've brought lunch to work every single day.

I've been trying to cook something healthy, hearty and virile enough to last a week in tupperware. Last week it was a red quinoa & sweet potato pilaf (that sadly went un-photographed). This week I am thinking up some concoction with kale, caramelized onions, carrots, avocado and whole wheat pasta. But two weeks ago… two weeks ago I made this delicious Indian-inspired chickpea stew.


I would say the dish was easy to make, but it was slightly time consuming. I could probably attribute this to the fact I have two stove burners and a tiny oven (ah, the joys of living in a studio) but I would like to say all the ingredients were cooked with a coordination usually reserved for Thanksgiving dinner. There was some roasting, toasting and reducing going on and I just can't do that all by my lonesome that quickly. In reality though, there wasn't too much skill involved - a 19-year old dorm-dwelling collegiate guy could do it.

It was substantial enough that on it's own I could fill myself up at lunch. Usually though I tossed in some brown rice to avoid a serious case of the snack attacks at 3pm. I have a snack drawer full of almonds and trail mix at my desk for a reason, but I like to reserve those for desperate times. Like when I feel the urge to stress eat or am very actively trying to avoid the communal candy bowl.


Chickpeas with Roasted Cumin and Tomatoes
Adapted from eCurry

Ingredients:
  • 2.5 cups cooked chickpeas
  • 1 tablespoon vegetable oil
  • 2 teaspoons of grated fresh ginger
  • 1 green cardamom
  • 2 cloves
  • 1 teaspoon cumin seeds
  • fresh cilantro/coriander leaves
  • 2 hot green chile peppers, chopped – Optional
  • salt to taste
  • ½ teaspoons of turmeric
  • 1.5 cups fresh or canned tomato puree
  • 1.5  teaspoon roasted ground cumin

Directions:
  1. Combine turmeric, salt, and the roasted cumin with the tomato puree and 1/2 – 1 cup water and stir it to mix.
  2. Dry roast the cardamom, clove in the pan. You will know they're done when you start smelling the spices roasting.
  3. Add the oil and the cumin seeds.
  4. Add the chopped peppers if you want it spicy. Once the cumin seeds start turning dark add the ginger paste. Cook for about a minute.
  5. Add the tomato puree mix, stir it in, and let it let it cook for about 4-5 minutes at medium heat.
  6. Add the chickpeas, cover and simmer for for 7 – 10 minutes. Uncover and mash up a few chickpeas with the back of the spatula. This should be like a soup, not dry. So if the water dries up, add more water when you are boiling. Simmer for couple of more minutes. Switch off the heat and keep it covered until ready to serve.
  7. Garnish with fresh cilantro/coriander leaves.

Sunday, April 1, 2012

No-Knead Beer Bread


So these past two weeks have been kind of hectic insane totally crazy. I am now two weeks into my new job and one week into a little bug I affectionately call The Plague. Oh, and I whizzed on in to the ripe old age of 24 this past Monday. Somehow during all of this I also managed to start and finish the entire Hunger Games trilogy. I think I may have snuck in a nap or two, swirled 'A' into the mixture and came out on the other end alive but lacking a voice. Hopefully a new book, some honey & lemon tea and a little bit a sun will be the cure I need.

As you may have guessed, there wasn't much time for blogging. And by not much time I mean none at all. I think I may have looked at my photo log to see if anything was queued up but that's as far as I got. So here I am, Sunday afternoon, willing my voice to work and ready to blog. If you notice this post is a little bit shorter than most it's because I most likely fell asleep and gave up.

I have been able to cook only a little bit in the past few weeks; it's mainly just food for lunch at work. Now that I'm falling into a routine, I hope it might become a little bit more of a regular occurrence and less of a side-thought. I made this particular loaf of bread maybe a month or more back. Don't worry, it's not sitting stale on my kitchen counter. I think 'A' and I gobbled the whole thing up the night I baked it. As I am a pretty big fan of the no-knead bread movement, I decided to try a little variation on the classic. Throw some beer in (it's extra yeast, right?) and call it good.

I'll save my voice and stop rambling but before I go, I guess you'll want the recipe.


No-Knead Beer Bread
Recipe adapted from Cook’s Illustrated

Ingredients:
  • 3 cups all-purpose flour
  • 1/4 teaspoon instant yeast
  • 1 1/2 teaspoon salt
  • 3/4 cup + 2 tablespoon water at room temperature
  • 1/4 cup + 2 tablespoon mild lager at room temperature
  • 1 tablespoon wine vinegar

Directions:
  1. Whisk flour, yeast, and salt in large bowl. Add water, beer, and vinegar. Using rubber spatula, fold mixture, scraping up dry flour from bottom of bowl until shaggy ball forms. Cover bowl with plastic wrap and let sit at room temperature for 8 to 18 hours.
  2. Lay 12- by 18-inch sheet of parchment paper inside 10-inch frying pan and spray with non-stick cooking spray. Transfer dough to lightly floured work surface and knead 10 to 15 times. Use a little flour on your work surface if you need to.
  3. Shape dough into ball by pulling edges into middle. Transfer dough, seam-side down, to parchment-lined frying pan and spray surface of dough with nonstick cooking spray. Cover loosely with plastic wrap and let rise at room temperature until dough has doubled in size and does not readily spring back when poked with finger, about 2 hours.
  4. About 30 minutes before baking, adjust oven rack to lowest position, place a Dutch oven (with lid) on rack, and heat oven to 500F.
  5. Lightly flour top of dough and, using a sharp knife, make one long, 1/2inch deep slit along top of dough.
  6. Carefully remove pot from oven and remove lid. Pick up dough by lifting parchment overhang and lower into pot (let any excess parchment hang over pot edge). Replace the lid and place in oven.
  7. Reduce oven temperature to 425F/220C degrees and bake covered for 30 minutes.
  8. Remove lid and continue to bake until loaf is deep brown  20 to 30 minutes longer. Carefully remove bread from pot; transfer to wire rack and cool to room temperature, about 2 hours.

Thursday, March 15, 2012

Vegan Mini Roasted Apple & Pear Pies


I haven't taken a math class since my senior year of high school; beyond reason, I was able to count Astronomy 111 as a math in college. However, I've been an avid fan of Pi Day for as long as long as I can remember. Never having been mathematical groupie, my love of Pi Day has been called into question, Maury-style, more than a few times. Maybe I'm a fan of puns (I also celebrate May the 4th), pie or have an appreciation of people who actually do and enjoy math. While it's probably all of the above, I think my love of food trumps my aversion to math. Give me a set of analogies or tedious word problems, but I'd rather walk around a Möbius strip for all eternity than figure out the tip on a bill.

Yet wouldn't you know, I think yesterday was the first time I actually made a pie on Pi Day. Sure, I've made a pie somewhere within the confines of March and called it good, but I've never baked and subsequently eaten one on 3.14. Good thing yesterday was a day of firsts and I finally made some cute little mini pies. A day of firsts you ask? Why yes, it was. I cooked fish, in fact a filet of salmon, for the first time in my entire life, started editing photos for my first ever professional(ish) photography assignment and went for a long walk in the rain… on purpose.


At the end of the day, I felt pretty proud of myself. I was noshing on a delicious salmon dinner with 'A' and eagerly awaiting my first homemade Pi Day pie. As most readers know, I'm allergic to cows milk but am deathly afraid of Crisco and as such, am usually at a perilous crossroad when it comes to making pastries. While I guess Earth Balance 'butter' is sort of like Crisco, its yellowy, stick-like, buttery appearance convinces me otherwise. So after some successful Googling, I found a vegan pie crust that was in compliance with my standards and seemed as though it would be flaky enough.

While the dough was a little wet, the crust baked up wonderfully crispy. If you aren't vegan or don't feel like using this pie crust recipe, I found that halving a recipe for a double crust resulted in enough dough for two mini pies and a little bit to spare.


Vegan Pie Crust
Adapted from Someday Spoon

Ingredients:
  • 1 stick of vegan butter, cubed and chilled
  • 1/2 tsp. salt
  • 1 1/8 cup pastry flour
  • 1/4 cup water, chilled
  • 1/2 tbsp. white sugar
  • Flour for the rolling surface

Directions:
  1. Preheat the oven to 400 degrees F and grease two 4 in. ceramic ramekins.
  2. Pulse the flour and salt in a food processor.
  3. Add the vegan butter and pulse the mixture together into beads of dry clumps. If you do not have a food processor, alternatively you can use a large fork to mix the ingredients together.
  4. Pour the pre-chilled water into the food processor a little at a time while pulsing the mixture.
  5. When about half the water has been transferred, also add a pinch of white sugar.
  6. Transfer the dough onto a well-floured cutting surface. Roll into a ball.
  7. Wrap the ball in plastic wrap and freeze for at least an hour. Dough can be frozen for up to 12 hours before continuing making the pie.
  8. Remove the dough from the freezer and roll out with a rolling pin on a floured surface to 1/4″ thick.
  9. Cut dough into 4 circles; two larger ones for the bottom and two smaller ones for the top. Freeze until ready to fill pies.


Roasted Apple & Pear Pie Filling 

Ingredients:
  • 1 Granny Smith apple, peeled and diced
  • 1 pear, peeled and diced
  • 1/8 cup brown sugar
  • 1 teaspoon cinnamon
  • 1/2 teaspoon nutmeg
  • 1/2 teaspoon ginger powder
  • 1/4 teaspoon allspice

Directions:
  1. Spread apples onto a cookie sheet. Sprinkle with brown sugar and spices.  
  2. Bake in an oven preheated to 400 degrees for 35-45 minutes.   
  3. Remove the apples from the oven. Carefully place the pie crusts in the bottom of the ramekins.  Fill generously with the apple/pear pie mixture.  
  4. Top with smaller circles of dough and cut slits for venting. Place ramekin on a clean cookie sheet, return to oven and bake for an additional 25-30 minutes, or until the pie crusts are golden brown.  Allow to cool before serving.