Thursday, September 30, 2010

No-Knead Sourdough

Here is another delicious no-knead bread to add to your repertoire.  It's made in a similar fashion as other no-knead breads, but with the your sourdough starter instead of a little bit of active dry yeast.  Sometime, hopefully soon, I hope to write a tutorial on sourdough.  Sadly, I feel as though I'm a genius on the subject yet and I in no way want to lead you astray.  As I have mentioned earlier, the first attempt at a sourdough starter was a little bit lackluster and I had difficulty starting it.  I sort of 'cheated' and used a little tiny bit of active dry yeast.  I really mean it, MAYBE a 1/4th of a teaspoon, but more like an 1/8th.  Then I combined it with some flour and water in a large jar and let it sit. 

But sit it did not.  I came back from class a few hours later (remember, I was making this my senior year of college) and it had exploded all over my kitchen.  Well, not technically, but I did had the blob reincarnated.  It was spewing out of its jar, onto the counter and I think a little even crawled onto the floor.  And I had no idea how to stop it.  I remember hearing once (I think it was Alton Brown?) that "yeast hates salt" - i.e. it stops it from growing.  It helped, but then it never came alive again.  When I made some bread with said starter, it had the right texture but no sour taste.  I read more about sourdough and tried to revive it (partially successfully), but it was laid to rest in a plastic garbage pail tomb before my move out west.  My current starter, given to me by my friend Ann, is fantastic!  So sour!  The texture is consistent and it's not fussy!

This no-knead wasn't as sour as other loaves of bread that I've made, but it was easy, definitely had a chewier texture and a 'sour' aftertaste.  But the crust, OH, the crust… it was wonderful!  So thick and with the right amour of crunch.  It was wonderful on my sandwich I made for lunch the next day or on the peanut butter toast I made for breakfast the day after.  If you're uncomfortable with sourdoughs but want to try your hand at making them, I recommend this recipe!
No-Knead Sourdough
Ingredients:
  • 15 oz bread flour (about 3 cups)
  • 1.5 tsp salt
  • 11 oz lukewarm water (1.25 cups, plus a tablespoon)
  • 1/2 cup sourdough starter, fed
Directions:
  1. Mix the salt with the flour, and the sourdough with the warm water. Then combine all the ingredients and mix for 20 seconds or just until all of the flour is wet. If you work the mixture, you will have a loaf with a tight crumb.  I wanted one that had big air pockets, so I worked it as little as possible.
  2. Cover the bowl with plastic wrap and then a tea towel (this helps trap in heat), and leave it to rise at room temperature overnight (about 18 hours).
  3. The next day dust the dough with a bit more flour and fold the sides into the middle to form a round loaf, dust a towel with stone ground cornmeal (or coarse salt) and place the loaf onto it seam side down, putting more cornmeal on top then fold the towel over.
  4. Let the loaf rise until it has doubled in size again. When the loaf has almost doubled in size, but the dutch oven in the oven and set it for 475 degrees (it is important to put the dutch oven into a cold oven so it doesn't experience thermal shock).
  5. When the dutch oven is rocket hot, place (toss) the dough, seam side up, into the dutch oven, and put the lid back on. Bake for 25 minutes, during this time the lid will trap moisture from the dough which will allow the crust to stay stretchy as the bread continues to rise. Then take the lid off and turn the oven up to 475. Take the loaf out of the oven once it is brown and crusty, 15-20 more minutes.

Wednesday, September 29, 2010

Vanilla Cupcakes with Strawberry/Raspberry Buttercream

Here's a little secret: I use cupcakes to woo boys and make friends.  I know, it may seem a little shady and unsavory, but hey, I'm in a new city!  Cut me a break!

I actually made these cupcakes a long time (read: 3 weeks) ago.  Soon after moving to Seattle, I went to a rooftop BBQ in Belltown (downtown Seattle) because my roommate and a friend Nick knew the people who were hosting through some other people.  Sorry, let me clarify.  A friend of a friend of a friend was hosting a BBQ.  Clear?  No?  Moving on… Anyways, we chatted and hot tubbed and swore to meet up again.  Cut to two weeks later, I go out on a Friday night in Capitol Hill with about 5 of the people I met at the BBQ.  More merriness ensued, we exchanged numbers, discovered that we were all new to Seattle and wanted friends!  That Sunday we all got together for a game/"make your own pizza" night and thus the cupcakes were born!!! (Along with some sourdough pizza, but more on that later)

This is another successful recipe procured from my "More from Magnolia" cookbook that I picked up when I was in New York City this year.  Not only is it an amazing cookbook, it is also incredibly ironic that it is my new "go to" cookbook because I live in the Magnolia neighborhood of Seattle.  Spooky!!  The actual cupcake is incredibly fluffy and moist with a strong vanilla flavor.  When baking, then don't form too much of a dome but just enough that they are a perfect  canvas for decorating.

Now the buttercream.  It's my forte, there is no skirting around that.  Earlier in the year I found out that I am pretty good at making buttercreams in most flavor combinations just off the top of my head.  I know, it's a gift, or what four years (or the baking induced "stress relieving" nights) at the University of Michigan taught me.  Recently I've been on a fresh fruit buttercream kick.  This results in a more naturally sweet buttercream (but don't discount the powdered sugar, there is still plenty of that) and I usually use less butter to achieve my desired consistency.  So maybe I can sell this buttercream off as "health food?"  Anyways, for this buttercream I used a combination of strawberries and raspberries.  While these fruits are both wonderful, they also have 'seeds' and must be smushed through a strainer before being beaten into buttercream.

Magnolia's Vanilla Cupcakes
Adapted from: More from Magnolia
Ingredients:
  • 2 ¾ cups All Purpose Flour
  • 2 ½ teaspoons baking powder
  • ¾ teaspoon salt
  • 1 cup (2 sticks) unsalted butter, softened
  • 2 cups sugar
  • 4 large eggs, at room temperature
  • 1 cup almond milk
  • 2 teaspoon vanilla extract (I also used a vanilla bean, but that is completely optional)
Directions:
  1. Preheat oven to 350 degrees and line muffin tins with cupcake papers.
  2. In a small bowl, sift together flour, baking powder and salt.  Set aside.
  3. In a large bowl, cream (preferably with an electric mixer) the butter until smooth and light yellow in color.  Gradually beat in the sugar until fluffy, approximately 3 minutes.  Add in the eggs one at a time, beating well after each addition.
  4. Add the flour mixture in three parts, alternating with the milk and vanilla.  This is key: after each addition, make sure to beat enough to incorporate the ingredients, but do not overbeat.  (This will create gluten and you will have rough and dry cupcakes)
  5. Using a spring loaded ice cream scoop (or other preferred dispensing method), carefully dispense the batter into the cupcake liners, filling them about ¾ of the way full.
  6. Bake for 20-25 minutes, or until a cake tester is inserted into the center of the cupcake and comes out clean.

Strawberry/Raspberry Buttercream
Ingredients:
  • 1 cup strawberries, cored and halved
  • 1 cup raspberries
  • 1 stick butter, softened
  • splash of vanilla extract
  • 4 cups powdered sugar (approx).
Directions:
  1. Puree strawberries and raspberries in a food processor until smooth.  Smush through a large strainer into a bowl.  Add softened butter and vanilla extract, beat until well incorporated.
  2. Add powdered sugar slowly, about 1 or 2 tablespoons at a time, until desired consistency is reached (needs to be thicker for piping).
  3. Can be stored in a air tight container in a refrigerator for up to a week.

Sunday, September 19, 2010

Tomato Spinach Lentil Soup


I'm on a very healthy kick right now… minus the few pieces of chocolate I need to get me through the week.  I also am not inspired to spend a few hours in the kitchen every night.  My solution?  Soups!  Oh no, not just any soups, lentil soups.  As I am a little tight for money right now, I am looking to make things that are not only healthy and inexpensive, yet utilize fresh produce and are fun to make.  Cue lentils, spinach, tomatoes and onions.

When lentils were on sale at Whole Foods a few weeks ago, I bought a couple pounds.  However being that they only cost $1.50 a pound, I didn't have to resort to digging for quarters in my couch.  On top of their surprisingly low price, they are high in health benefits!  Worried about your cholesterol?  They have an app for that (too far?)!  Lentils are a good source of cholesterol-lowering fiber and this helps to manage blood sugar levels due to their high fiber content.  Vegetarian and worried about nutrients?  Lentils supply six important minerals, two B-vitamins and protein with (essentially) no fat.  This is just the tip on the bean stalk, if you want to find out more, head over to The World's Healthiest Foods.

I presume you're here for the main act, the soup, so I will stop with the smoke and mirrors.  Simply put, this soup has a very full and rich flavor.  It has a thicker texture than tomato soup, but the lentils provide a good amount of texture.  While the flavor of the spinach isn't too prevalent, the brightness of the tomatoes is instantly noticeable.  The amount pictured above is what I ate for lunch one day and I was very full until late in the evening.  It was a good full though; I was satisfied and full of energy.  I still have a lot of lentils to use, so I hope to post some more lentil-centric recipes in the near future!

Tomato Spinach Lentil Soup

Ingredients:
  • 1 tablespoon  Extra Virgin Olive Oil
  • 
1 Onion, diced
  • 
1 Carrot, diced

  • 4 Cloves Garlic, crushed

  • 2 tablespoons dried thyme
  • 
43 oz. Can Fire Roasted Diced Tomatoes
    4 cups vegetable stock
  • 
1 1/2 cup Lentils, rinsed and picked over for debris
    2 handfuls of baby spinach
  • 
Salt & Pepper to taste

Directions:
  1. Heat large cast iron pot over medium-high heat, add the olive oil.  Once oil is hot, slowly add the onions and carrots until onions are translucent, about 6 minutes.
  2. Add the garlic and thyme and cook for a minute.  Pour in the tomatoes along with the vegetable stock, spinach and lentils.  Stir to combine and bring the mixture to a boil.  Reduce heat to low, cover pot, and simmer for 25 minutes or until lentils are tender.
  3. Once lentils are tender, blend the mixture with an immersion blender (a lot easier!) or in a blender.
  4. Serve and enjoy!

Wednesday, September 15, 2010

Homemade Sriracha Sauce


I love all things spicy, but I think it comes with the territory of being a redhead.  I always order the hottest sauce possible at restaurants and Trader Joe's jalapeno hot sauce is drizzled on even the most inappropriate of foods.  To me, eggs are almost inedible without hot sauce.  I almost wonder why it took my so long to make my own hot sauce... especially because I have a strange love of making my own condiments.

To make this recipe even better, it is so easy to make.  Essentially all you need to do is let roughly chopped peppers sit overnight in a brine.  The hardest part is simmering the peppers and waiting for them to cool.  But that glorious moment that you get to taste your own hot sauce on a veggie burger (...well, that's what I did...) it's worth it.  I brought the sauce to a game/"make-your-own-pizza" night with some new friends here in Seattle and it worked well on most of the pizzas that we made!  I know I poured an obnoxious amount of it on the pizza I ate.  But please remember, I like hot sauce on everything.  There is definitely some heat to this sauce, but the actual flavor of the peppers and garlic is still able to shine through.

Homemade Sriracha Sauce
Ingredients:
  • 1/2 pound red fresno chiles, coarsely chopped (I used 0.7 lb)
  • 4 garlic cloves (5.6)
  • 1 teaspoon kosher salt (I used 1 2/5 tsp)
  • 1 cup distilled white vinegar (I used 1 2/5 cups)
  • 2 tablespoons palm sugar (I used 2.8 TBSP)
Directions:
  1. Place all the ingredients except the sugar in large glass bowl, loosely cover with plastic wrap and allow to sit overnight.  This brine helps mellow the heat of the peppers.
  2. Place the mixture and sugar in small saucepan. Bring to a boil over high heat, then lower the heat and simmer for 5 minutes. Remove from heat and set aside to cool to room temperature.
  3. Blend with an immersion blender (or a food processor/blender) until a smooth, orange-red mixture forms. Run through a strainer and smush out as much juice as possible.
  4. Once refrigerated, the sauce should have the same consistency and texture as Sriracha, BUT I think it tastes better, is less salty and tastes much fresher.

Monday, September 6, 2010

Penne with Heirloom Tomato Sauce and Roasted Tofu

I'm pretty proud of myself.  This was a dinner that's original destiny was to become a quick and healthy dinner to use up my heirloom tomatoes.  Yet as soon as I tasted the sauce, I knew I would have to snap a picture and blog about it (hence the poor light/photo quality).  I used three different varieties of heirlooms (don't you dare ask me what kind, I forgot) and their flavors exploded into a magical concoction right on my stove top!  The sauce had a strong rich flavor with a slight acidity that hit the tip of the tongue.  With the addition of a little sprinkling of sugar the flavor also took on a bright quality.

I was still settling into Seattle when I made this and was itching to cook in my kitchen.  Alas, I didn't have too many groceries and I was exhausted.  I did have about $20 worth of heirloom tomatoes that I had bought a few days earlier at Pike Place.  Sadly they began to go bad a lot sooner than I had hoped and I'm shockingly not a fan of plain tomatoes.  So when life gives you good quality, but a little bit old, tomatoes... make some pasta sauce!

But pasta sauce and noodles is both boring and soo college.  Solution? Roasted tofu!  It is healthy, delicious, easy and eco friendly.  Not to mention easy of the pocket book; I bought a twin pack of tofu for $2 or $3 at Trader Joe's.  While my combination of flavors suited my taste, use any combination you're comfortable with.

For this recipe, you may use any type of whole wheat pasta cooked to the manufactures directions.


Heirloom Tomato Sauce
Ingredients:
  • 4 large heirloom tomatoes, seeded and diced
  • 3 medium cloves of garlic, crushed and minced
  • 1/2 tablespoon sugar (or to taste)
  • Salt and pepper, to taste
  • 1/2 (approx) cup basil, chiffonade
Directions:
  1. Heat chopped tomatoes in a medium sauce pot over medium heat, stirring occasionally with a wooden spoon.
  2. Once the tomatoes have reduced (or achieved a more liquid consistency), stir in garlic, salt, sugar and pepper.  Simmer over low heat until tomatoes break down further, approximately 20 minutes
  3. When the sauce has reached desired  consistency, remove from heat.  I prefer to have a chunkier sauce, but you may either puree to have a smooth sauce.  Stir in basil and serve.

Roasted Tofu
Ingredients:
  • 1 lb extra firm tofu, cut into 1/2 inch cubes
  • 2 tablespoons extra virgin olive oil
  • Sea salt and freshly cracked black pepper, to taste
  • Dash of Paprika
  • Dash of Crushed Red Pepper
Directions:
  1. Preheat oven to 400 degrees.  Line jelly roll pan with parchment paper.
  2. Toss tofu in a small bowl with remaining ingredients.  Arrange tofu on baking sheet and cook for 10 minutes.  Remove from oven and flip tofu with tongs to the other side.  Bake for another ten minutes.  Tofu is down when the outsides are crispy but the inside remains soft.
  3. For this recipe, combine with tomato sauce and spoon onto pasta and toss before serving.

Thursday, September 2, 2010

Guest Blog Post: Chicken Burgers

Photo Credit: My Dad, Ed Martin
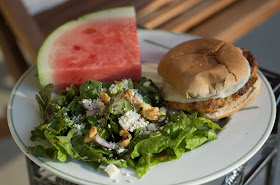
This recipe has crossed multiple time zones to make its way to you.  As my mom will mention later in the post, I started eating chicken earlier this summer.  I was still a little hesitant about eating chicken but I wanted to be able to eat something other than the hot dog buns at a barbecue.  Being the wonderful mother that she is, my mom developed this recipe while I was still living in Michigan.  I have to say, it is wonderful!  While I don't know what a beef burger tastes like, I think these smell better than beef burgers when they are sizzling on the grill.  It's shaping up to be a beautiful weekend in Seattle, so fire up your balcony grills, stop by Trader Joe's and be prepared to feed the packs of people that will be clamoring for seconds (maybe even thirds!).

Per the request of my mom, here is a picture of the two of us in Europe last summer.  She wanted this particular picture because her eyes are open.  To most people, this wouldn't be an issue.  However, if you are a descendant of the Bock family, keeping your eyes open in pictures is an ever present challenge.  This picture was taken on the train going from Amsterdam to Paris:


--

Just in time for Labor Day Weekend, a quick and easy grilling recipe.  After many years of being a vegetarian my daughter Katherine (aka The Ginger Cook) added chicken to her diet.  With grilled burgers being a family summer favorite,  I wanted to find a recipe that my daughter could eat.   I looked up several ground chicken burger recipes online and blended a few together to come up with what I think is a great moist burger with a terrific tasty zing.  Cut up the watermelon, put together a salad and you have a great summer meal!

Chicken Burgers
Ingredients:
  • 1 t. garlic
  • 1 lb ground chicken
  • 1/2 cups bread crumbs
  • 1/8 c. milk
  • 1 egg
  • 3 T. chopped onion
  • 1/4 t. cayenne pepper
  • 3/4 t. sea salt
  • cracked pepper to taste
Directions:
  1. Mix together all listed ingredients.  Form into patties
  2.  Grill on medium heat on an oiled grill to prevent them from sticking.